


Making Fonts Available
This chapter explains how to install fonts, modify the font path, and use the directory chooser.
To Install Fonts
Choose Install from the Fonts menu.
Figure 3-1 Install Dialog
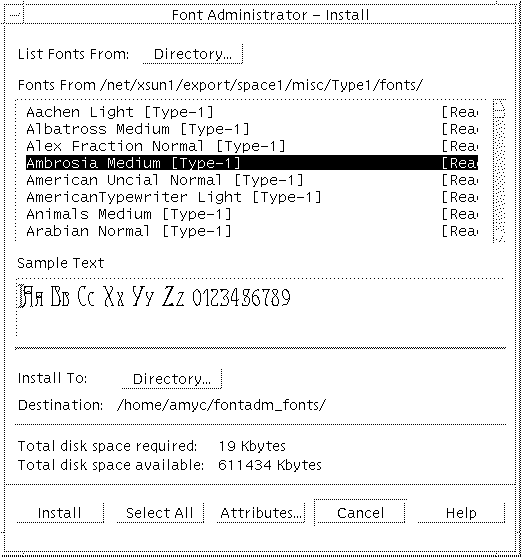
At the top of the Install dialog, click the List Fonts From Directory button.
Figure 3-2 Directory Chooser
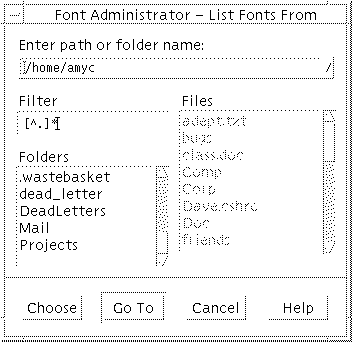
Use the directory chooser to browse for and select the directory containing the fonts you want to install. When you find the directory you want, double-click the directory, and then click Choose to display a list of fonts in the directory. For more information about the directory chooser, see "To Use the Directory Chooser".
Note - There may be a pause while Font Administrator searches for fonts in the directory you choose.
On the Install dialog, select the font or fonts you want to install. If you want to install all the fonts, click Select All.
Choose the local host or a printer for which to install fonts.
Use the directory chooser to browse for and select the installation destination directory. For more information about the directory chooser, see "To Use the Directory Chooser".
Check that the disk space available is greater than the disk space required.
Click Install.
Note - To install fonts to the shared system directory /usr/openwin, you must run Font Administrator as the root user.
To Resolve Conflicts
If there is a conflict between a font you tried to install, and a font with the same name that has already been installed, Font Administrator displays the conflict dialog.
Figure 3-3 Conflict Dialog
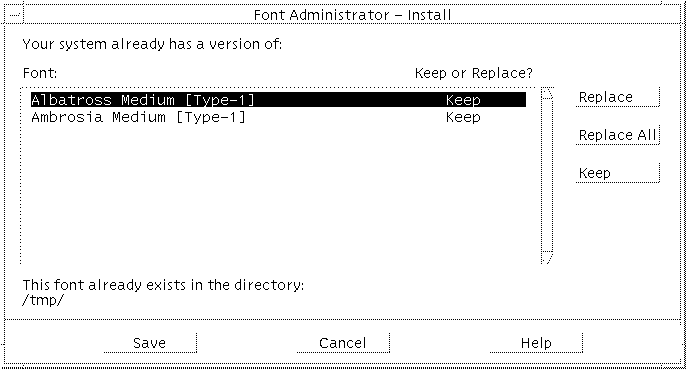
The conflict dialog lists the fonts you tried to install that already exist on your system.
To Keep All Fonts
To keep all of the previously installed fonts, click Save.
To Replace All Fonts
To replace all fonts:
Click Replace All.
Click Save.
To Replace Selected Fonts
To replace selected fonts:
Click a font you want to replace.
Click Replace.
Repeat steps 1 and 2 for each font you want to replace.
When you have completed steps 1 and 2 for each font you want to replace, click Save.
To Add the Installation Directory to the Font Path
When you, as the root user, install a font into a directory that is not in the default font path, Font Administrator offers to add it to the default font path for you automatically. You can also choose to add it manually via the Modify Font Path dialog.
Figure 3-4 Add Installation Directory Dialog
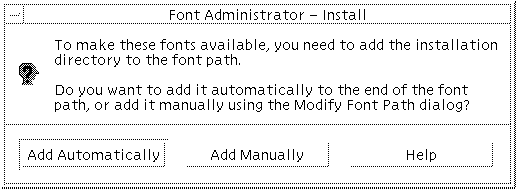
Note - This dialog only appears if you run Font Administrator as the root user. For other users, Font Administrator appends the installation directory to the user's font path. The change to the user's font path lasts until the user quits Font Administrator.
To Modify the Font Path
Modifying the font path may include the following subtasks:
To List the Font Path
To Reorder the Font Path
To Delete Font Path Elements
To Add Font Path Elements
Note - To modify the font path, you must run Font Administrator as the root user.
 Caution - The default font path is shared. Modifying the default font
path will affect all users who reference it.
Caution - The default font path is shared. Modifying the default font
path will affect all users who reference it.
Caution - Installing OpenWindows will initialize the default font path.
You may want to keep a record of the changes you make to the default font
path, so that you can recreate them if you install OpenWindows.
To List the Font Path
To list the font path you want to modify:
Choose Modify Font Path from the Options menu.
Figure 3-5 Modify Font Path Dialog
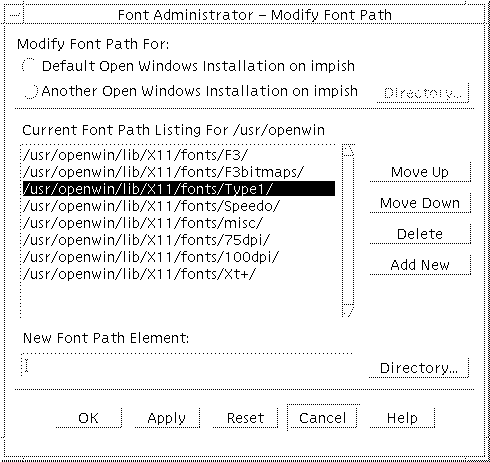
On the Modify Font Path dialog, click the appropriate radio button for the font path you want to modify.
If you are modifying the font path for another OpenWindows installation on the local host, click Directory and use the directory chooser to select the alternative OpenWindows installation. For more information about the directory chooser, see "To Use the Directory Chooser".
If you are modifying the font path for a NeWSprint printer, select the printer on the printer option menu.
Font Administrator lists the font path you choose.